Rebel Runner Harley 25 Re-fit

Monday, 26 May 2014

More work, more progress.

Another weekend, another day of graft. The weather wasn't kind on Monday so I spent most of the time inside while the rain drummed on the roof. Nice and cosy now though. First job was to fit the footrest, an inspired idea from this forum. Folded away neatly:


And deployed for use:


Then I stuck my head under the crew seat and finished off all the wiring and venting for the Webasto heater. There are only two tasks left: fitting the exhaust skin fitting and the fresh air intake. Both outside jobs, and driving rain is not required.


When the boat arrived it had a Navico multi function display with through hull transponder, speed, temperature and timing features. It was removed to make way for the Garmin set-up. I decided why waste it, it has useful features and could always be a back-up. I took the cup-holder off and installed it in its place. That should have been simple, but behind that bulkhead was the black box sounder which had to be moved, and I had run out of fuse spaces. So I had to put in a new fuse block and another ground bus-bar, but that would come in useful later.


My Icom handheld VHF came with a charging base, and it makes a secure holding-place. I screwed it to the side shelf and routed the charging cable back to the electrics behind the bulkhead, making a permanent fixture.


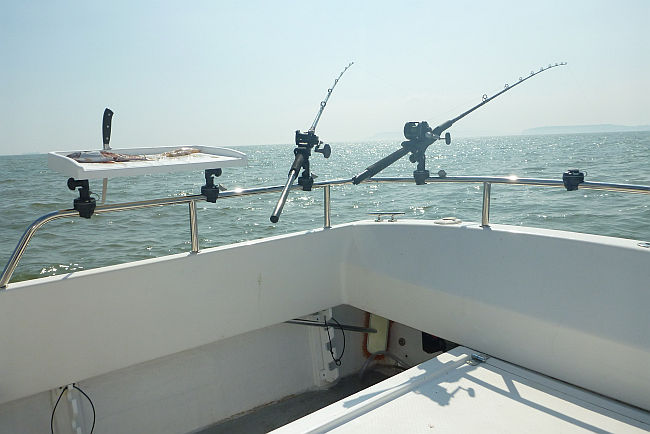
And then...the rain eased off! Time for a quick outside job before home. I had bought two sets of rod holders which were fitted at the stern. Did I mention I love this work so much I do it twice? First time round the rod holders were fitted upside down. Lucky I noticed before looking at the photo! You can also see the life belt and holder fitted previously.


The next major job will be lining out the cabin. Watch this space


Posted by Neville Merritt at 13:33 No comments:
Email ThisBlogThis!Share to XShare to FacebookShare to Pinterest

Sunday, 18 May 2014

First trip after the re-fit

Today was sea trials day, but I had a couple of jobs to do first. I must like fitting out boats so much I do jobs twice. This one was refitting the table, as first time round it was a bit bendy so it was taken back to my workshop for some beefing up. That was successfully refitted. I also finished the galley cupboard with the last bit of ply painted and in place. I had a few minutes left before the marina gate opened so I cut some anti slip matting to fit the table and various other places. This shot of the helm also shows the teak boss I made for the wheel, and the Garmin Downvu in place.


It was time for sea. I started the engine, and moved out to the fuel berth to take on 160 litres. I was very relieved to see that the Webasco fuel pipe hole I had cut did not leak a drop. I headed out for a bit of fishing, the weather was perfect, plenty of sun and a gentle breeze. There were also a few ships about so I could try going through their wash. Nothing broke! Steady as a rock. The water was still a bit coloured so I wasn't too hopeful. However, the first spot produced smoothhound and pouting. It went quiet so I moved to another mark, partly to get used to the Alderney method with a different boat. Here is a photo for Garry, the bowsprit behaved perfectly. One thing I did notice is the gap in the rail over the bowsprit is exactly me-sized so I shall have to watch I don't take a dive when detaching the ring. I did have a worrying moment though, the engine wouldn't start! I tracked it down to a stuck stop solenoid which had not slackened off, a quick prod and we were back in business.


Here are the Railblaizas at work


and me watching them. By the way I treated myself to a new Spinlock life jacket, very comfortable and an excellent spec.


The table makes an excellent rig station.


Before long I had to head back in because I had a date. My wife brought food down so we could have a first meal on board. What a star!


It was a perfect evening, warm and still and after the meal we had coffee in the cockpit watching the mullet, including a monster. All that work finally seemed worth it.

Now for Phase 2
Posted by Neville Merritt at 14:44 No comments:
Email ThisBlogThis!Share to XShare to FacebookShare to Pinterest

Sunday, 27 April 2014

Dinner is served! (Nearly)

And now for the rest of that Airfix kit. The fridge was one of the first things I bought, and I bought it back in September so Garry could make sure it fitted his galley. At last, it was time to fit it. This is the bare shell inside the galley.


I had lost confidence in the flexible water tank I bought so I had a custom one made, that exactly fitted the galley under the cupboard floor. It was a tight fit in through the door but in it went. I had made some framing to go around it, and eventually all was fitted and connected up. I filled it (55 litres) and not a drop leaked which was good. That thing will take a day to get at if there is ever a problem.


The rest of the cupboard components had to be fitted, which was not as easy as it should have been. Or not as easy as it would have been if a boat is cube-shaped, which it isn't. Lots of adjustments needed!

Finally, the fridge went in. It is a clever design, with the guts separate which means the whole fridge space can be used. They are installed on a shelf behind the unit.


It runs on 240v or 12v depending on which supply is detected. I wired it all up and it hums along nicely. I also added the locker door, but the catch needs a bit of adjustment so I took it off and brought it home (hence the hole).


Final couple of jobs were mounting the Garmin 551dv which is on the screen pillar, and gluing down a couple of section of teak trim. I also made a teak centre boss for the steering wheel. Pictures next time.
Posted by Neville Merritt at 13:43 No comments:
Email ThisBlogThis!Share to XShare to FacebookShare to Pinterest

Thursday, 17 April 2014

It's all coming together!

I promised results today and luckily the weather and gremlins were kind and I managed to do most of what I had planned to do. Which is rare. Not the first job but the most impressive was fitting the helm. This is a KAB seat as fitted to the Seaward boats, and finished in a custom vinyl. I used the existing pedestal which is sprung.


I fitted a folding drinks holder too


The longest job was fitting a filler section between the seat boxes Garry made.


This raises the floor 230mm and has enough room under to be useful so I made a hinged hatch trimmed in teak, with white in Jotun 2-pack. The inside is a bit scruffy to I will look out for a vinyl floor offcut to line it.


The fixed rear seat was fixed in place and has a removable base giving access to the seat box inside. The back has a slidey contraption so it could be removed if required. The front seat box has a hinged lid painted in Jotun Hardtop, and on that is mounted a heavy duty turntable. On the turntable is a KAB crew seat.


I had made a table over the winter, and this is mounted with two brackets on the side wall and a pole made from canopy fittings so it can be easily removed. I will have to stiffen it a bit and find a way of stopping it popping out of the brackets.


As you can see all my measuring and worrying was unfounded as the seat can twizzle with a bit of slide work and miss the table as it turns.


On my way home I received a text to say the water tank is on its way, so next trip will be to fit out the galley cupboard, install the water tank and fridge. It is soooo good to put some time in and see a big result!
Posted by Neville Merritt at 15:44 No comments:
Email ThisBlogThis!Share to XShare to FacebookShare to Pinterest

From my workshop

I am really looking forward to tomorrow. Lots of bits to install, the result of hours of sawing, sanding, routing, filling, more sanding, priming, more sanding and painting. It looks like a full size Airfix kit


What you see are the two main seats, pedestal, turntable, seat reducer for the pedestal, a lot of trim, all the framing and base for inside the galley (dang water tank hasn't turned up yet), floor and locker for the raised platform, table and galley locker door. I am particularly pleased with the table


Teak is a joy to work with. I made the locker door for the galley out of ply painted with two pack and trimmed with a teak moulding, varnished satin as is all the other teak trim.

Posted by Neville Merritt at 15:43 No comments:
Email ThisBlogThis!Share to XShare to FacebookShare to Pinterest

A short morning's work

I have been busy in my shed making components, all the bits should be ready by next weekend so I can fit them - if the water tank turns up, that is. In the meantime I made a bit more progress but I only had a morning. The Webasto heater is now fully wired for power and the fuel line plumbed in. I sent my steering wheel back and swapped it for one that wasn't dished, for some reason it was £100 more and didn't come with a boss but it has gained me precious millimetres at the helm position. It is now in place, complete with the teak blank covering the old steering mounting.


It was so pleasant outside I fitted and glued in the rubber seal for the hatch. Looks neat, I had to buy a larger size than originally planned.


Finally, I fitted the CO alarm. Not much but it was something to tick off!


Next week I will have something spectacular to show, the seats are all ready to go in.
Posted by Neville Merritt at 15:42 No comments:
Email ThisBlogThis!Share to XShare to FacebookShare to Pinterest

Sunday, 6 April 2014

A new floor

This was the weekend to do more brave things. First up was to stick the new floor down. Having carefully cut, trimmed and fitted all the floor components, I went to the marina early on Saturday and did the deed. The floor is 6mm thick so it needed pressing down while the adhesive went off. What is heavy and readily available in the marina? Water! About ten buckets were light enough to carry and there was about 60Kg of weight when they were full and it worked very well.


Next morning I was back to see how it had come out. Brilliant! And you have to look very close to see the join. The hatch is more noticeable but it is, after all, a hatch. I carefully cut out a shape for the flush pull thingy, that was a job but worth it.


The next brave thing was drilling a hole in the fuel tank for the Webasco heater fuel pipe. After staring at it for a long time I took a deep breath and started. I was worried I would drop loads of plastic shavings into the fuel, so I took out the fuel gauge sender and made a sort of cranked tongue out of ally strip, coated it in Vaseline and positioned it so it would stay under the drill hole as I cut through. That worked a treat, the tongue came out all covered in white bits which didn't end up in the fuel. The fuel pipe was trimmed and threaded up through the new hole. It was nearly a disaster because the tank wall is so thick there was hardly any thread showing but I got the nut started eventually and it threaded on fine.


Working back, I fitted the fuel metering pump, the fuel pipe and cable. It was a struggle because that gap is only a few inches!


The main heater unit is fitted, but I am missing one bit of flexi pipe so I couldn't connect it all. The power cable is routed to the main electrics board but I have run out of space for more fuses, I'll have to get creative. I am still trying to work out where all the bits connect, as it is not obvious, for example where does the fuel metering pump cable go to?


Finally, the wiring for the battery switches and alternator was completed by Scott so I used a Maplins box to keep the shunt secure. I decided to abandon the flexible water tank and have a custom one made. That will go under the locker floor up to the level of the switches. I am making loads of components in my workshop, all ready for painting and fitting, so it will all come together very suddenly (I hope!)

Posted by Neville Merritt at 14:18 No comments:
Email ThisBlogThis!Share to XShare to FacebookShare to Pinterest
Newer Posts Older Posts Home
Subscribe to: Posts (Atom)

About Me

My photo
Neville Merritt
My blogs contain thoughts, ideas and comments that haven't made it to my hobby site www.boat-angling.co.uk
View my complete profile

Blog Archive

  • ▼  2021 (1)
    • ▼  October (1)
      • Neutral Indicator
  • ►  2020 (1)
    • ►  July (1)
  • ►  2018 (1)
    • ►  May (1)
  • ►  2015 (8)
    • ►  December (2)
    • ►  September (1)
    • ►  July (1)
    • ►  May (1)
    • ►  April (1)
    • ►  March (1)
    • ►  January (1)
  • ►  2014 (48)
    • ►  October (1)
    • ►  September (3)
    • ►  August (3)
    • ►  June (5)
    • ►  May (2)
    • ►  April (6)
    • ►  March (4)
    • ►  February (7)
    • ►  January (17)
Watermark theme. Powered by Blogger.