
Monday 28 December 2015
A seat pedestal to rely on
I am very pleased with my KAB helm seat, it makes the boat feel very grown-up. I originally mounted it on the boat's original (Plastimo again) pedestal but I began to feel it wasn't man enough for the job. It was fully adjustable and had a limited shock absorbing suspension but it wasn't up to KAB standards of ruggedness. It has gone wobbly on me a couple of times which is a very uncomfortable feeling when you need to hang on during a bit of wave bashing. My Christmas present was a new and very sturdy pedestal from the same supplier as the seat. It was the perfect job for an afternoon in the marina. The old pedestal came out, and the new one screwed in place. As I suspected, the holes did not quite align and new ones had to be drilled but nothing showed so that was OK. I am now looking forward to a bit of rough stuff!

New Marine Toilet (bargain!)
I am still doing bits of work from time to time. The sea toilet that came with the boat was a Plastimo model and if you remember an earlier post, had not been very reliable (that's putting it politely). Plus the seat was plastic and wobbly. I researched to the cost of a new seat (£42) and a maintenance kit (£49) and found that I could replace it with a brand new Jabsco compact toilet for £104. No contest! The old loo came out and the new loo went in with little trouble. I had to cut a new hole in the bulkhead for the outlet pipe which came away from the toilet at a different angle, but that was all. Everything connected up and it is now fully functioning, with no leaks or surprising sprays!


Sunday 13 September 2015
Trim Tabs
I usually lift my boat out of the water in August to re-paint the anti-fouling, have the leg serviced and do any underwater jobs that can only be done on dry land. This year I decided to install trim tabs and after a lot of research, decided on Bennett trim tabs from PH Marine. There is a lot of advice on-line so I was confident I could do the job myself. I had to wait until lift-out until I could measure the transom exactly, and it was just as well I did that before ordering because the top of the actuator where the standard hydraulics runs through is exactly at deck level. Fortunately you can have external hydraulics which is what I ordered. The installation was very straightforward, although the worst bit was, as usual, pulling the boat apart to run the cables through. Eventually all was done: trim tabs installed, connected up, system bled, controls calibrated and all the anti-fouling done. I am looking forward to a test run!


Sunday 26 July 2015
Cabin Lining
The weather was too bad even for Ben Ainsley today so I spent the afternoon finishing off the hull lining in the cabin. First, the hull sides were covered in closed cell foam, which had to be cut round the chines. This hull has quite deep ridges to cover.


It now makes my bunk cushions look very tatty, that will have to be the next job. I am not happy with the join between coachroof sides and headlining, I looking at options for hiding that gap. Anyway, the cabin now looks far more sophisticated and is a lot better insulated too.

Not so the carpet, which had to go on in one piece to avoid joins. One side is over two metres long, but fortunately the carpet is very floppy and stretchy so it is easier than in could be.
It now makes my bunk cushions look very tatty, that will have to be the next job. I am not happy with the join between coachroof sides and headlining, I looking at options for hiding that gap. Anyway, the cabin now looks far more sophisticated and is a lot better insulated too.
Sunday 10 May 2015
Flares Locker
Another small job today, as I was too lazy to get out early for fishing before the cill closed. My box of flares are well buried in a locker and need to be near at hand. I found a self-contained locker and lid that required a cut-out and simply screws in place. After careful measuring I cut the hole with a multi-tool and hole cutters for the corners. It doesn't interfere with the inside space because the top access to the main box is a hole in the centre, so the top corner is dead space.

I made a label using a weatherproof sticker, printed with a laser printer. The flares don't spill out when you open the box because they are retained with a bungee cord and grips, easy to rip off when they are needed.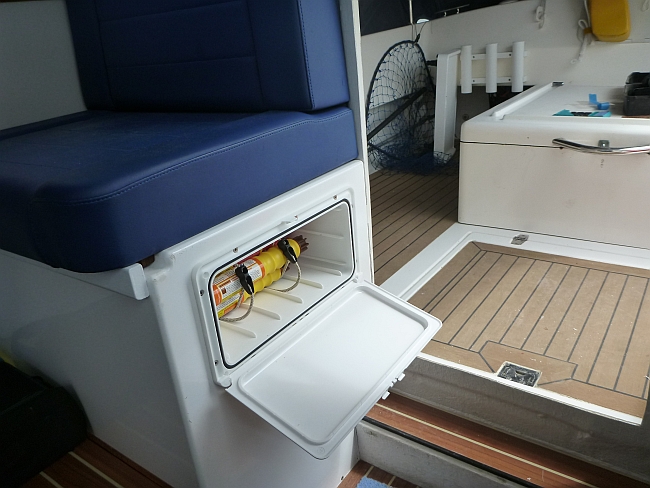
I made a label using a weatherproof sticker, printed with a laser printer. The flares don't spill out when you open the box because they are retained with a bungee cord and grips, easy to rip off when they are needed.
Sunday 26 April 2015
Curtain Doors
This might be a bit tarty for some, but this is what I have been doing. Doors are fine but the trouble is they have to go somewhere when they open and that can be a struggle in a small boat. I decided to fit curtain doors to the heads and cabin for privacy when it is needed (by my guests). I borrowed my daughters sewing machine and dragged up memories of making curtains when I bought my first house. The heads curtain was more difficult as it has an angle cut-out to accommodate the slope in the roof. The rail is a smooth plastic dowel, and one side of the curtain is secured by press studs.

When the curtain is closed it is secured by a turnbuckle. The fabric is a polyester marine material.

The other curtain door is between the wheel house and cabin. This has to be removed when not in use so it has an elastic "curtain rail" with hooks at each end, and is hooked to two small rings on the bulkhead.

When the curtain is not in use it is folded up and put out of the way. I made a little draw-string bag for it out of off-cuts.

Now the weather is warmer and drier, I must get on with lining the hull in the cabin area with foam for insulation, followed by carpet from Mega Van Mats. I am procrastinating that one because it will be hard work (and smelly).
Sunday 15 March 2015
Cabin headlining progress
The cabin headlining is nearly done and was a lot trickier than I thought. Lots of paper templates, trial fitting, back home for trimming, fitting again, even a complete design change halfway through to make the fit more snug. The Lewmar hatch trim kit made life a lot easier but there were a lot of curves to take account of. 8mm ply pads were Sikaflexed to the roof, and the headlining boards screwed to that made of 5mm ply covered in foam-backed vinyl. The raw fibreglass coach room now looks cosy.
The original raw cabin interior looked like this:

Now it looks like this:

The original raw cabin interior looked like this:


Next step is to glue high density foam to the hull sides, then glue van lining carpet to the foam. I can only do that when the weather is warmer and drier, to make sure there is no risk of condensation getting in the way of the adhesive.
Sunday 25 January 2015
Progress report, January 2015!
This thread has been quiet for a while as I have been working on lining out the cabin. Not much to show yet! This is my brother helping to measure for the paper templates


The switch is on my boat key ring


This and other jobs were interrupted by an annoying problem with fuel starvation which took a long time to track down. It turned out to be a string of silicone or PTFE in the fuel pipe which bunched up under flow pressure. All sorted now!
The other projects were a bit fiddly. I had installed a Wema steering sender gauge so I could tell where my outdrive was pointing. This is particularly useful when docking. It involved fitting a sender unit, but the transom area is nearly inaccessible and the Mercruiser steering yoke is tiny and had nothing to fix it to. I ended up fitting an access hatch in the rear cockpit side, which was needed anyway to access the power steering, and an elaborate bent brass arm fitted to the steering yoke. This links via a stainless rod to the Wema sender, which I have mounted on a little shelf.
The other projects were a bit fiddly. I had installed a Wema steering sender gauge so I could tell where my outdrive was pointing. This is particularly useful when docking. It involved fitting a sender unit, but the transom area is nearly inaccessible and the Mercruiser steering yoke is tiny and had nothing to fix it to. I ended up fitting an access hatch in the rear cockpit side, which was needed anyway to access the power steering, and an elaborate bent brass arm fitted to the steering yoke. This links via a stainless rod to the Wema sender, which I have mounted on a little shelf.

The gauge now works!

Another job that should have been easy was to fit a remote switch with timer delay for the cockpit light. My thinking was that it would be convenient if when I arrived in the dark I could switch the cockpit light on with a button on the key fob, even if the boat power was off. When leaving, wouldn't it be cool to do the same while I lock up, and the light would switch itself off after 40 seconds? I reasoned that this would only need a timer delay like they have for car lights, and a remote switch. Both are cheap and plentiful in eBay and Amazon. Here is what I bought:

The delay module didn't have a box so I used a Maplins project box.
The receiver and delay were wired up with a fused live feed directly from the battery, by-passing the battery master. This switch is in parallel to the normal switch for the cockpit light.
There is a board full of electrickery under the galley, I mounted them there.
The receiver and delay were wired up with a fused live feed directly from the battery, by-passing the battery master. This switch is in parallel to the normal switch for the cockpit light.
There is a board full of electrickery under the galley, I mounted them there.

The switch is on my boat key ring

Press it and the cockpit light comes on for 40 seconds then goes off.

You may notice that the remote unit fitted is not the same as the one in the earlier photo. That one was unreliable, it would work fine then go on strike. I bought another, that one did not work at all. I am very grateful for Dave (of this and the Solent forum) who took both units apart and remade all the solder joints so they worked. The power of the internet! You buy something from China then someone you would never otherwise have met is a wiz at soldering and can make it work for you. I love this technology.
Subscribe to:
Posts (Atom)